Rendering Curves In Godot
Posted On: 2024-02-05
The design for my current project often needs organic shapes: twists and curves rather than angles and lines. Working in Godot has led me to revisit this old problem with new tools, and the solution I've come up with this time is much more portable and user-friendly than anything I had previously, so I thought I'd share it in today's post.
Creating
Godot's Path2D node provides designers with a way to create and edit bezier curves, without having to interact with their underlying mathematics. Such curves can be a handy way to create organic-looking shapes directly in the Godot Editor, but, ordinarily, a Path2D will only display in the editor (its intended purpose is to serve as an invisible guide for other objects to follow.) Fortunately, it's possible to generate an approximation of the curve as a series of points (using Tessellate) - and that approximation can be used for any number of other purposes.
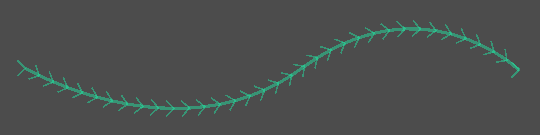
The Godot Editor provides a handy visual so you can see the shape of the (otherwise invisible) Path2D.
Drawing
A series of points can be made visible using the Line2D node. A Line2D can be configured to display in all kinds of different ways: with varying width, color, texture, etc. By feeding the points that make up (an approximation of) a Path2D's curve into the Line2D, one can render the Path2D exactly how they want it to look.
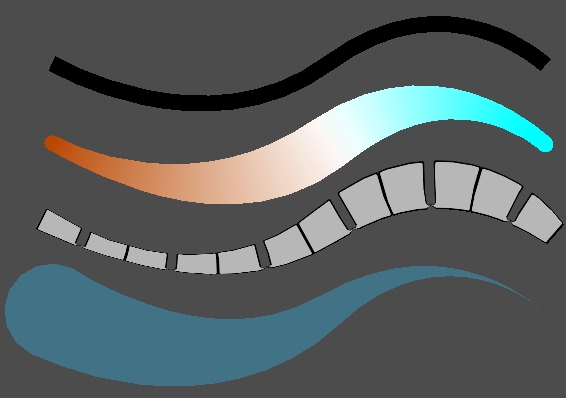
The same series of points can look radically different, depending on the settings of the Line2D.
Changing
What if a designer needs to change the Path2D? It's simple to do in the editor, but that won't change the Line2D, and, as a result, won't change what the end-user sees.
Fortunately, the
Curve
resource that stores the points of the Path2D emits the changed signal whenever the curve changes in any way. By connecting to that signal, code can automatically update the Line2D with the new points of the curve,
thereby keeping the line in sync with any changes the designer makes to the path.
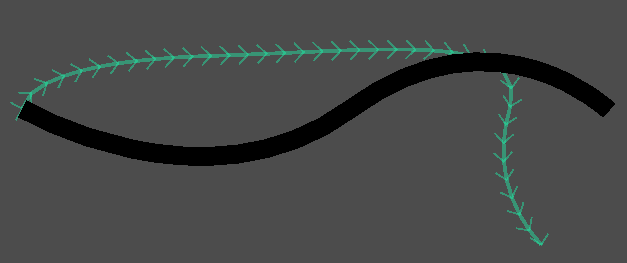
By default, changing the Path2D won't affect the line, meaning users won't see the new shape of the curve.
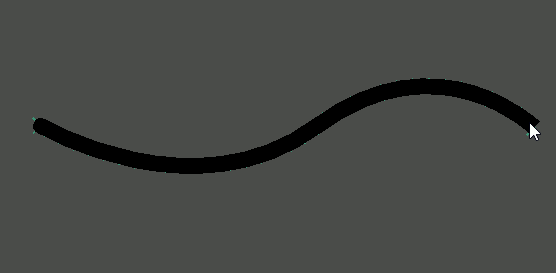
Thanks to signals, as you change the path, the line matches it in real-time - meaning that the moment you touch the control handles of the Path2D,
you can see how it will look to the end-user.
Coding
Creating code that does all those things requires going a bit outside my expertise - in order to get code to run in the Godot Editor, it needs to be some form of tool script, and C# support for tool scripts is a bit spotty (particularly when signals/events are involved.) Fortunately, Godot allows projects to use both C# and Godot's own built-in gdscript language at the same time, allowing me to implement this script in a language that any Godot 4 project can use. While it's not completely perfect (after attaching it, you have to save and reload the scene in order for it to activate), it's good enough for my own needs, and I expect it will fit others' needs as well. As such, I'm freely sharing that script here - use it however you'd like.
# Editor tool that uses a Line2D to visualize a Path2D
# To use it, attach this script to a Path2D, and then save, close, and re-open the scene
@tool
extends Path2D

@export var line: Line2D

## Controls whether the path is treated as static (only update in editor) or dynamic (can be updated during runtime)
## If you set this to true, be alert for potential performance issues
@export var update_curve_at_runtime: bool = false

func _ready():
    #Add a line if it doesn't exist
    #The line will be saved as part of the scene, so this will only run once
    if Engine.is_editor_hint():
        if line == null:
            line = Line2D.new()
            set_line_defaults()
            line.points= curve.tessellate()
            #Lock the line to prevent accidental changes
            lock_node(line)

            #Add the line and set it to save as part of the current scene
            add_child(line)
            line.owner=owner

    #In theory, _enter_tree should have already done this, but just to be safe...
    if Engine.is_editor_hint() or update_curve_at_runtime:
        if not curve.changed.is_connected(curve_changed):
            curve.changed.connect(curve_changed)

#Wire up signals on enter tree, since they are removed in exit tree
func _enter_tree():
    if Engine.is_editor_hint() or update_curve_at_runtime:
        if not curve.changed.is_connected(curve_changed):
            curve.changed.connect(curve_changed)

#Clean up signals (ie. when closing scene) to prevent error messages in the editor
func _exit_tree():
    if curve.changed.is_connected(curve_changed):
        curve.changed.disconnect(curve_changed)

func curve_changed():
    line.points=curve.tessellate()

#Sets the editor lock on a node, to prevent accidental changes
#Based on https://github.com/godotengine/godot-proposals/issues/3046
func lock_node(node:Node):
    node.set_meta("_edit_lock_", true);

#Newly added lines will have these settings by default
#Feel free to change these if you'd rather different defaults
func set_line_defaults():
    line.begin_cap_mode= Line2D.LINE_CAP_ROUND
    line.joint_mode=Line2D.LINE_JOINT_ROUND
    line.width = 10
    line.width_curve = make_default_curve()
    line.name = name+"_line"

#Makes a simple s-shaped curve going from high to low value
#This makes the curve start out wide, but end in a point.
func make_default_curve():
    var retval = Curve.new()
    retval.min_value = 0
    retval.max_value = 1
    retval.add_point(Vector2(0,1))
    retval.add_point(Vector2(1,0))

    return retval